This guide explains how to configure Single Sign-On (SSO) for the JEVis platform using Microsoft Entra ID (formerly Azure Active Directory).
By following the steps in this document, a Microsoft tenant administrator can register the JEVis application in their organization’s Entra environment, enabling users to log in securely with their existing Microsoft work or school accounts — without the need for separate JEVis credentials.
The setup connects JEVis to your organization’s Entra ID instance using the OAuth 2.0 / OpenID Connect protocol, ensuring secure authentication and centralized access control.
Prerequisites
Before starting, make sure you have:
- Administrator rights in Microsoft Entra ID (Global Administrator or Application Administrator role).
- Access to the Microsoft Entra Admin Center: https://entra.microsoft.com
- The ability to securely share the following values with the JEVis team after configuration:
- Tenant ID
- Client ID
- Client Secret
Step 1: Sign in to Microsoft Entra Admin Center
- Go to https://entra.microsoft.com
- Sign in using a Global Administrator or App Administrator account.
Step 2: Register the JEVis Application
- In the left navigation, go to Apps → App registrations.
- Click + New registration.
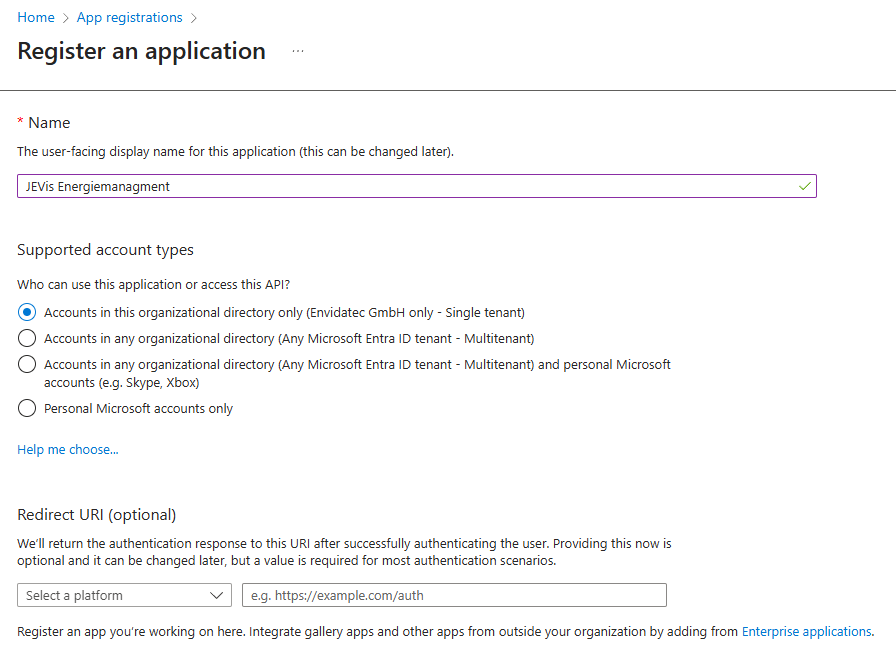
- Enter a Name, for example: “JEVis Energiemanagment”
- Under Supported account types, select: “Accounts in this organizational directory only (Single tenant) – if it’s for internal SSO only.”
- Under Redirect URI (optional), choose nothing
Example:
Step 3: Retrieve Tenant and Client IDs
After registration. You’ll be taken to the app’s Overview page.:
- Copy the following values:
- Directory (tenant) ID
- Application (client) ID
Save them securely — they’ll be needed for JEVis SSO configuration.
Step 4: Create a Client Secret
- In the app’s left menu, open Certificates & secrets.
- Under Client secrets, click + New client secret.
- Add a description (e.g. JEVis SSO Client Secret) and choose an expiration period.
- Enter a description (e.g. JEVis SSO) and choose an expiration period.
- Recommendation: Select 24 months or longer if available.
Using a longer validity period helps minimize administrative effort and prevents service interruptions caused by expired secrets.
- Recommendation: Select 24 months or longer if available.
- Click Add.
- Copy the Value of the newly created secret immediately.
Example:

🔐
Step 5: Configure API Permissions
- Go to API permissions.
- Click + Add a permission → Microsoft Graph.
- Choose Delegated permissions → select User.Read.
- Click Add permissions.
- Finally, click Grant admin consent for your organization.
Example:

Step 6: Provide JEVis with the Required Information
Send (securely) or configure the following values in your JEVis system:
- Tenant ID
- Client ID
- Client Secret
Notes
If you can’t find a menu item, use the search bar at the top of entra.microsoft.com
.